Customize Your Sign Up Page
Step 1: Setting Visible and Required Fields
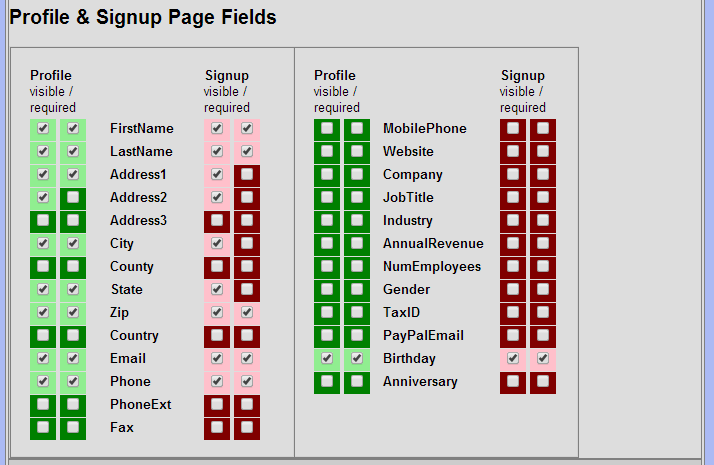
Navigate to My Account / Account Settings and expand the Program Settings area. At the bottom, you will see checkboxes for the Profile and Sign Up fields. For each field, you can check if you want it visible and/or required on the profile and sign up. Making something required on the profile will mean the customer must fill it out before they can access any offers. This allows you to make an easy, short sign up form, then gather more information later.
Also, toward the top of this section, you'll see a field for "Sign Up Page Backgound". You can enter a color name, like "red", or a HTML color code (hex #).
Your sign up page will by default use the logo file that is in /web/logo.website.jpg. If you want to change this, you can upload a new file (My Account / My Files) using that same name, or just upload a different file .. we'll cover how to customize in the next section.
Customizing the Look of Your Sign Up Page
Click on the "Sign Up Page" button at the top of the Account Settings page to edit your sign up page.
Once you save custom edits, changes made on Account Settings page will no longer impact your sign up page. You will have to manually edit / add fields or revert back to the default.
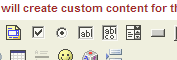
You can use the HTML editor tools provided to modify the look of your sign up page. From here, you also have access to the HTML source code.
Below the sign up page, you will see the default "After Sign Up Thank You Page". You can also edit this page to customize the content your customers will see after they sign up.
Adding Custom Fields
If you want to add a custom field to your sign up page, you can collect extra data about your customer. Each field response must be tied to a "Tag" on the customer record. The first step is to create a Tag entry for each possible response.
For example, lets say you want to add a check box asking customers if they are interested in Gluten Free menu offerings. You would first add a tag called "Gluten Free". If you want to add a drop down with multiple responses (like "Where did you hear about us"), add a Tag for each answer ("Website", "Yelp", "A Friend", etc). Read more about creating tags here.
Now, click on the "Sign Up Page" button at the top of the Account Settings page, to edit your Sign Up Page. The tool bar on the top has several tools for adding a check box or drop down field.
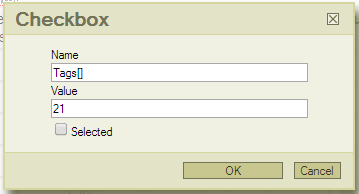
When you add a simple check box to your page, you'll configure with with Tags[] as the name and the numeric ID of the tag as the "value". For instance, if this check box will ask if customers are interested in Gluten Free, and the Tag "Gluten Free" is ID 21, I will enter a 21 in the value box here.
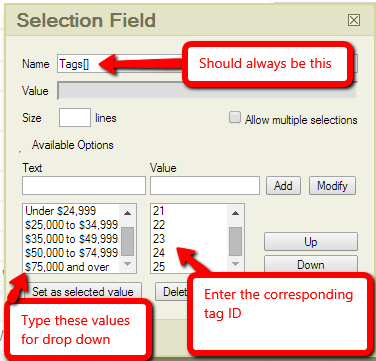
To create a drop down list, enter the name as Tags[]. Type the text for the drop down values, and for the "Value" enter the corresponding tag ID.
Now, test your form by signing up to ensure that the tags are reflected properly in the customer record!