How To Import Customers
Import as Leads or Customers?
First, decide if you want to import your data as "leads" or "customers". If these people are expecting to hear from you, and you want to automatically enroll them in your new rewards program, you can go ahead and import them as "customers", and put them on the rewards campaign. If you prefer to just "invite" them to join the program rather than automatically enroll them, we recommend that you import them as Leads. You can then send an invitation email -- when they respond by signing up (or if they sign up in your store) they will automatically be converted to customers and added to the rewards campaign .
Preparing to Import
Sometimes it's nice to track where customers came from. Tags are a great way to do this. Navigate to People / Customers and click on the Manage Tags button at the top of the screen to add a Tag that identifies your import source. This way you'll always know which customers came from this import.
Now, you need to prepare a .csv file for import. Your file should contain any of the following fields:
- CardID - If you want to assign a "cardID" it can be any unique number. Often, the customer phone number is used -- but just make sure you don't have any duplicates, as they won't get imported. You don't have to assign a cardID - if you don't, the system will assign it for you and it will be negative # (just like web signups get).
- First Name
- Last Name - If your data has these 2 fields together, try to split them apart before importing
- Address 1, Address 2, City, State, Post Code (zip), Country
- Phone
- Phone Extension
- Fax
- Mobile Phone
- Gender (Male or Female)
- Company
- Birthday (In MM/DD or MM/DD/YYYY for US, dd.mm or dd.mm.yyyy for UK)
- Anniversary (In MM/DD or MM/DD/YYYY for US, dd.mm or dd.mm.yyyy for UK)
- ServerID
- Date of Last Visit (In MM/DD or MM/DD/YYYY for US, dd.mm or dd.mm.yyyy for UK)
- Point Balance (current point balance, will trigger rewards)
- Total Spent (Lifetime spending)
- Point Balance 1 - 10 (These are supplemental point balances, not commonly used)
- Extra Name 1 - 6
- Extra Birthday 1 - 6 (In MM/DD or MM/DD/YYYY for US, dd.mm or dd.mm.yyyy for UK)
- Tags - comma separated tag ID (numbers) corresponding with tags set up in salesbuilder.
Tip: If you are using an Apple computer, please be sure to save the .csv as "Windows format"
Importing the Data
Navigate to People / Customers (or Leads) and click on Import at the bottom of the screen.
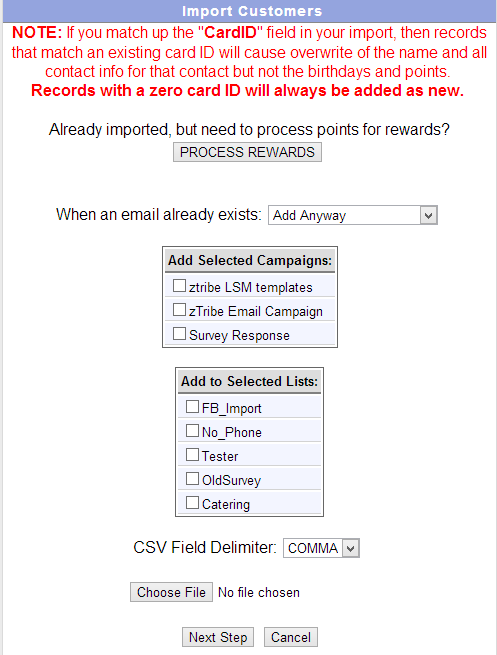
You've got some choices to make on this screen:
- Ignore the button that says "Process Rewards". You'll only use this - after the import - if you have imported customers with point balances and want the system to send out a reward based on those balances.
- When an email already exists: Choose if you want to add a duplicate, update the record or skip that record. Usually "Skip that record" is the appropriate choice. If you update the record and you are importing point balances / spending history, it will overwrite existing point balances.
- Add to campaign: If you want to add these customers to your default campaign, you can select it here. They will immediately receive the welcome message and welcome offer. If you want to add them without the welcome, we can do that later, so don't check the campaign here.
- Add to selected lists: This is where your custom Tags will be shown. As mentioned above, it's a good idea to add them to a Tag which identifies this particular import. That way, you can easily delete them if you make a mistake, or set them on a campaign later.
- CSV Field delimiter - this is most likely "comma".
- Now, choose your .csv file and click Next Step.
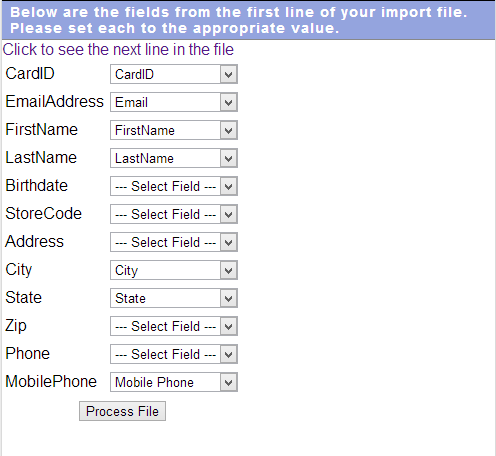
On this screen, you will match the fields in your file (on the left) to the fields in salesbuilder (on the right). If you are importing custom Tags, don't worry that there is no match in the drop down. As long as you've named your column "Tags" and included the numeric tag ID, it will work.
When you've matched all the fields correctly, click on Process File. It may take a while to process - you can minimize this screen but don't close it. When the system has completed the import, it will give you a success message at the top with the total # of contacts imported.
Why weren't all my contact imported?
If the number imported is slightly less than the number you started with, it's probably because some duplicate emails already existed in your database or in connected locations.
Next Steps: Working with imported customers.
Now that you've imported these customers, you may want to send them a broadcast email letting them know about your new rewards program. You may also want to set them on a campaign. Read more about how Tags work to help you find these customers.
Once you've searched and found just your newly imported customers, you can "Add them" or "Set Them" on your rewards campaign. This is done toward the bottom of the customer search screen.
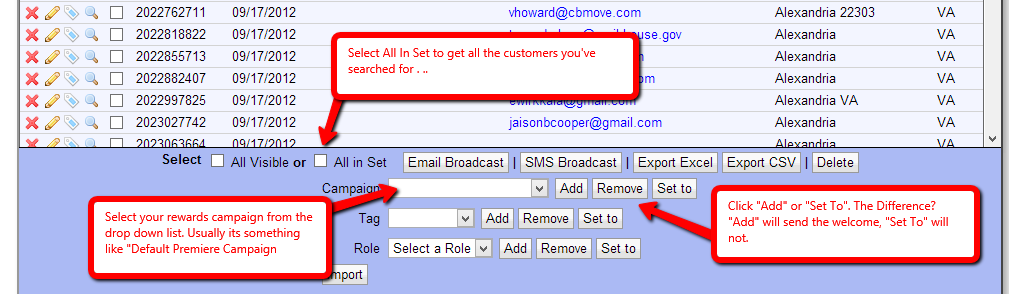
1. Click "Select All In Set" to select all the customers you've found with your search.
2. Select your rewards campaign from the drop down list. This is usually the 'Default Premiere Campaign"
3. Click "Add To" or "Set To". The difference? "Add To" will send your welcome message and offer. "Set To" will not, but will send future messages as customers earn them.
If you imported points from a previous program and want to trigger rewards to be sent, you can go back to the Import button and click that top button on the first screen -- "Process Rewards". This will send rewards to anyone with a point balance over your rewards threshold. Keep in mind, we only send a maximum of 5 rewards at one time. If a customer has a point balance of 1000, and your rewards are sent every 50, they'll get 5 rewards (using 250 points) and retain 750 points. On the next purchase, another 5 rewards will be triggered.
If you don't process rewards at this time, the customer's first purchase will trigger a reward to be sent if they have excess points.