Setting Up A Campaign
Navigate to the "Communications" tab and click on "Campaign Manager"
You'll see a list of campaigns that are active for your account. Click on the name of the campaign you want to edit (your main campaign probably says "Default" in the name)
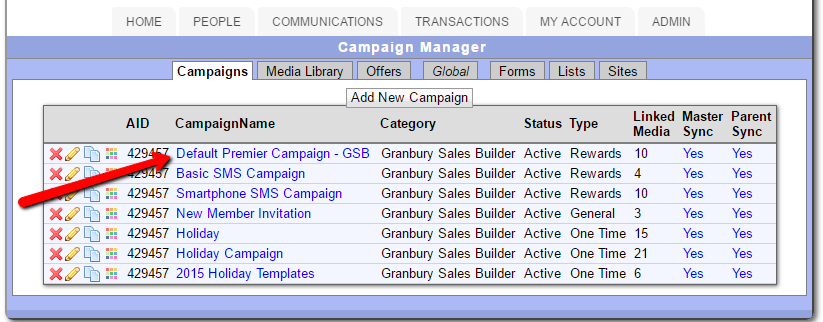
Now you will see a list of the messages that are part of the campaign.
To modify the details of your campaign, you can click on any existing message.

- Use the red X to remove the message from the campaign.
- Use the magnifying glass to see the landing page. This is what customers will see when they click on the offer link inside the message, if an offer is attached.
- The "PID" is the promo ID, this is an internal numbering system.
- The "AID" will show if you have multiple locations
- Click on the Media Name" to edit the content of the message
- The "Category" corresponds with the category of your account and can not be changed.
- The Status column lets you know if the message is active or inactive. Click on the message name to edit the status.
- The Type column lets you know if the message is email or text.
- The Trigger column controls when the message will be sent. Hover over the trigger area to see details about the trigger. Click on it to edit the trigger information below the list.
- The offers column lists the Offer ID for any offers that will be sent with this message. Click on the offer ID (or none) to edit the offers. (Learn More Here!)
- Master Sync controls whether this message is tied to the Granbury original. Normally, this should be set to NO
- Parent Sync controls whether this message is tied to a Parent account original. If you have multiple locations that share the same messages, this should be YES.
Below the list of messages, you'll see the Add / Edit media section. If nothing is selected, you can add a new message to your campaign. If an existing Trigger is selected, you can edit that message.
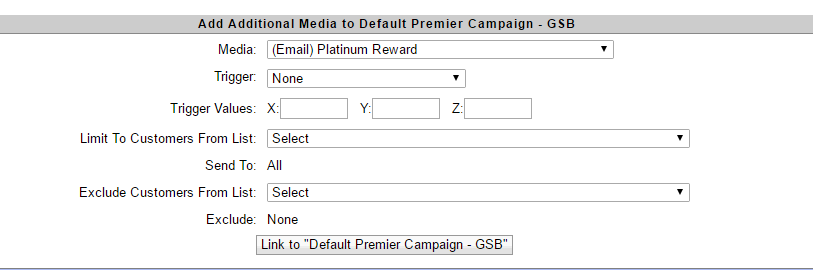
- Use the Media drop down to select a message you wish to send. If you need to create a new message, read about "Adding New Media".
- Select the Trigger you wish to use. To learn more about available triggers, click here.
- Use the X, Y and Z boxes to set trigger criteria. Each trigger has different options that you can set in these boxes. When you select the trigger, the explanation will appear to let you know what these are used for. You can also hold your mouse over the name of the trigger to see the criteria
- Use the "Limit To Customers From List" If you wish to target this trigger for only particular customers who meet a certain criteria. For example, if you want to send a Birthday offer but limit it to customers who've ordered in the past 90 days, you can choose a list to limit this trigger.
- Use the "Exclude Customers From List" if you wish to eliminate a certain set of customers from this trigger. For example, if you want to send a Lost Customer offer, but exclude customers who've spent more than $1000 in their lifetime (you'll call them instead).
The lists you see in these drop downs are the same lists you see in the Manage Customer page in the "Refine Results" options. You can get a preview of what customers may match this list criteria by selecting the list there. Of course, this may vary when the time comes for this trigger.
We've added a number of lists to your account, but if you don't see the criteria you need, your account manager can assist you with creating a new list criteria.
Default Campaigns
Each system is set up with a default campaign that your customers will automatically be enrolled in. If you want to change your default campaign, please contact your account manager.